From Concept to Mass Production: A Step-by-Step Guide for Engineers & Designers
Creating a plastic product, from idea to mass production, requires very careful planning and a clear process. Whether you are working on a high-tech IoT device, eco-friendly home products, or improving everyday items, it is very important to know the full plastic product development lifecycle . This helps to reduce risks, launch quick products , and achieve success in the market.
This guide explains the 5 key phases of plastic product development. It combines engineering methods and industry standards—such as material selection, mold flow simulation, regulatory compliance, and product updates after launch. It is designed for both startups and big companies . The guide focuses on :
- Balancing low costs with eco-friendly production.
- Using rapid prototyping tools.
- Turning user feedback into better designs.
By following this step-by-step plan, you can move from idea to selling your product with success—while avoiding expensive problems like mold corrections or failing legal rules. Are you ready to create products that not only meet requirements but are better than expected? Let’s begin.
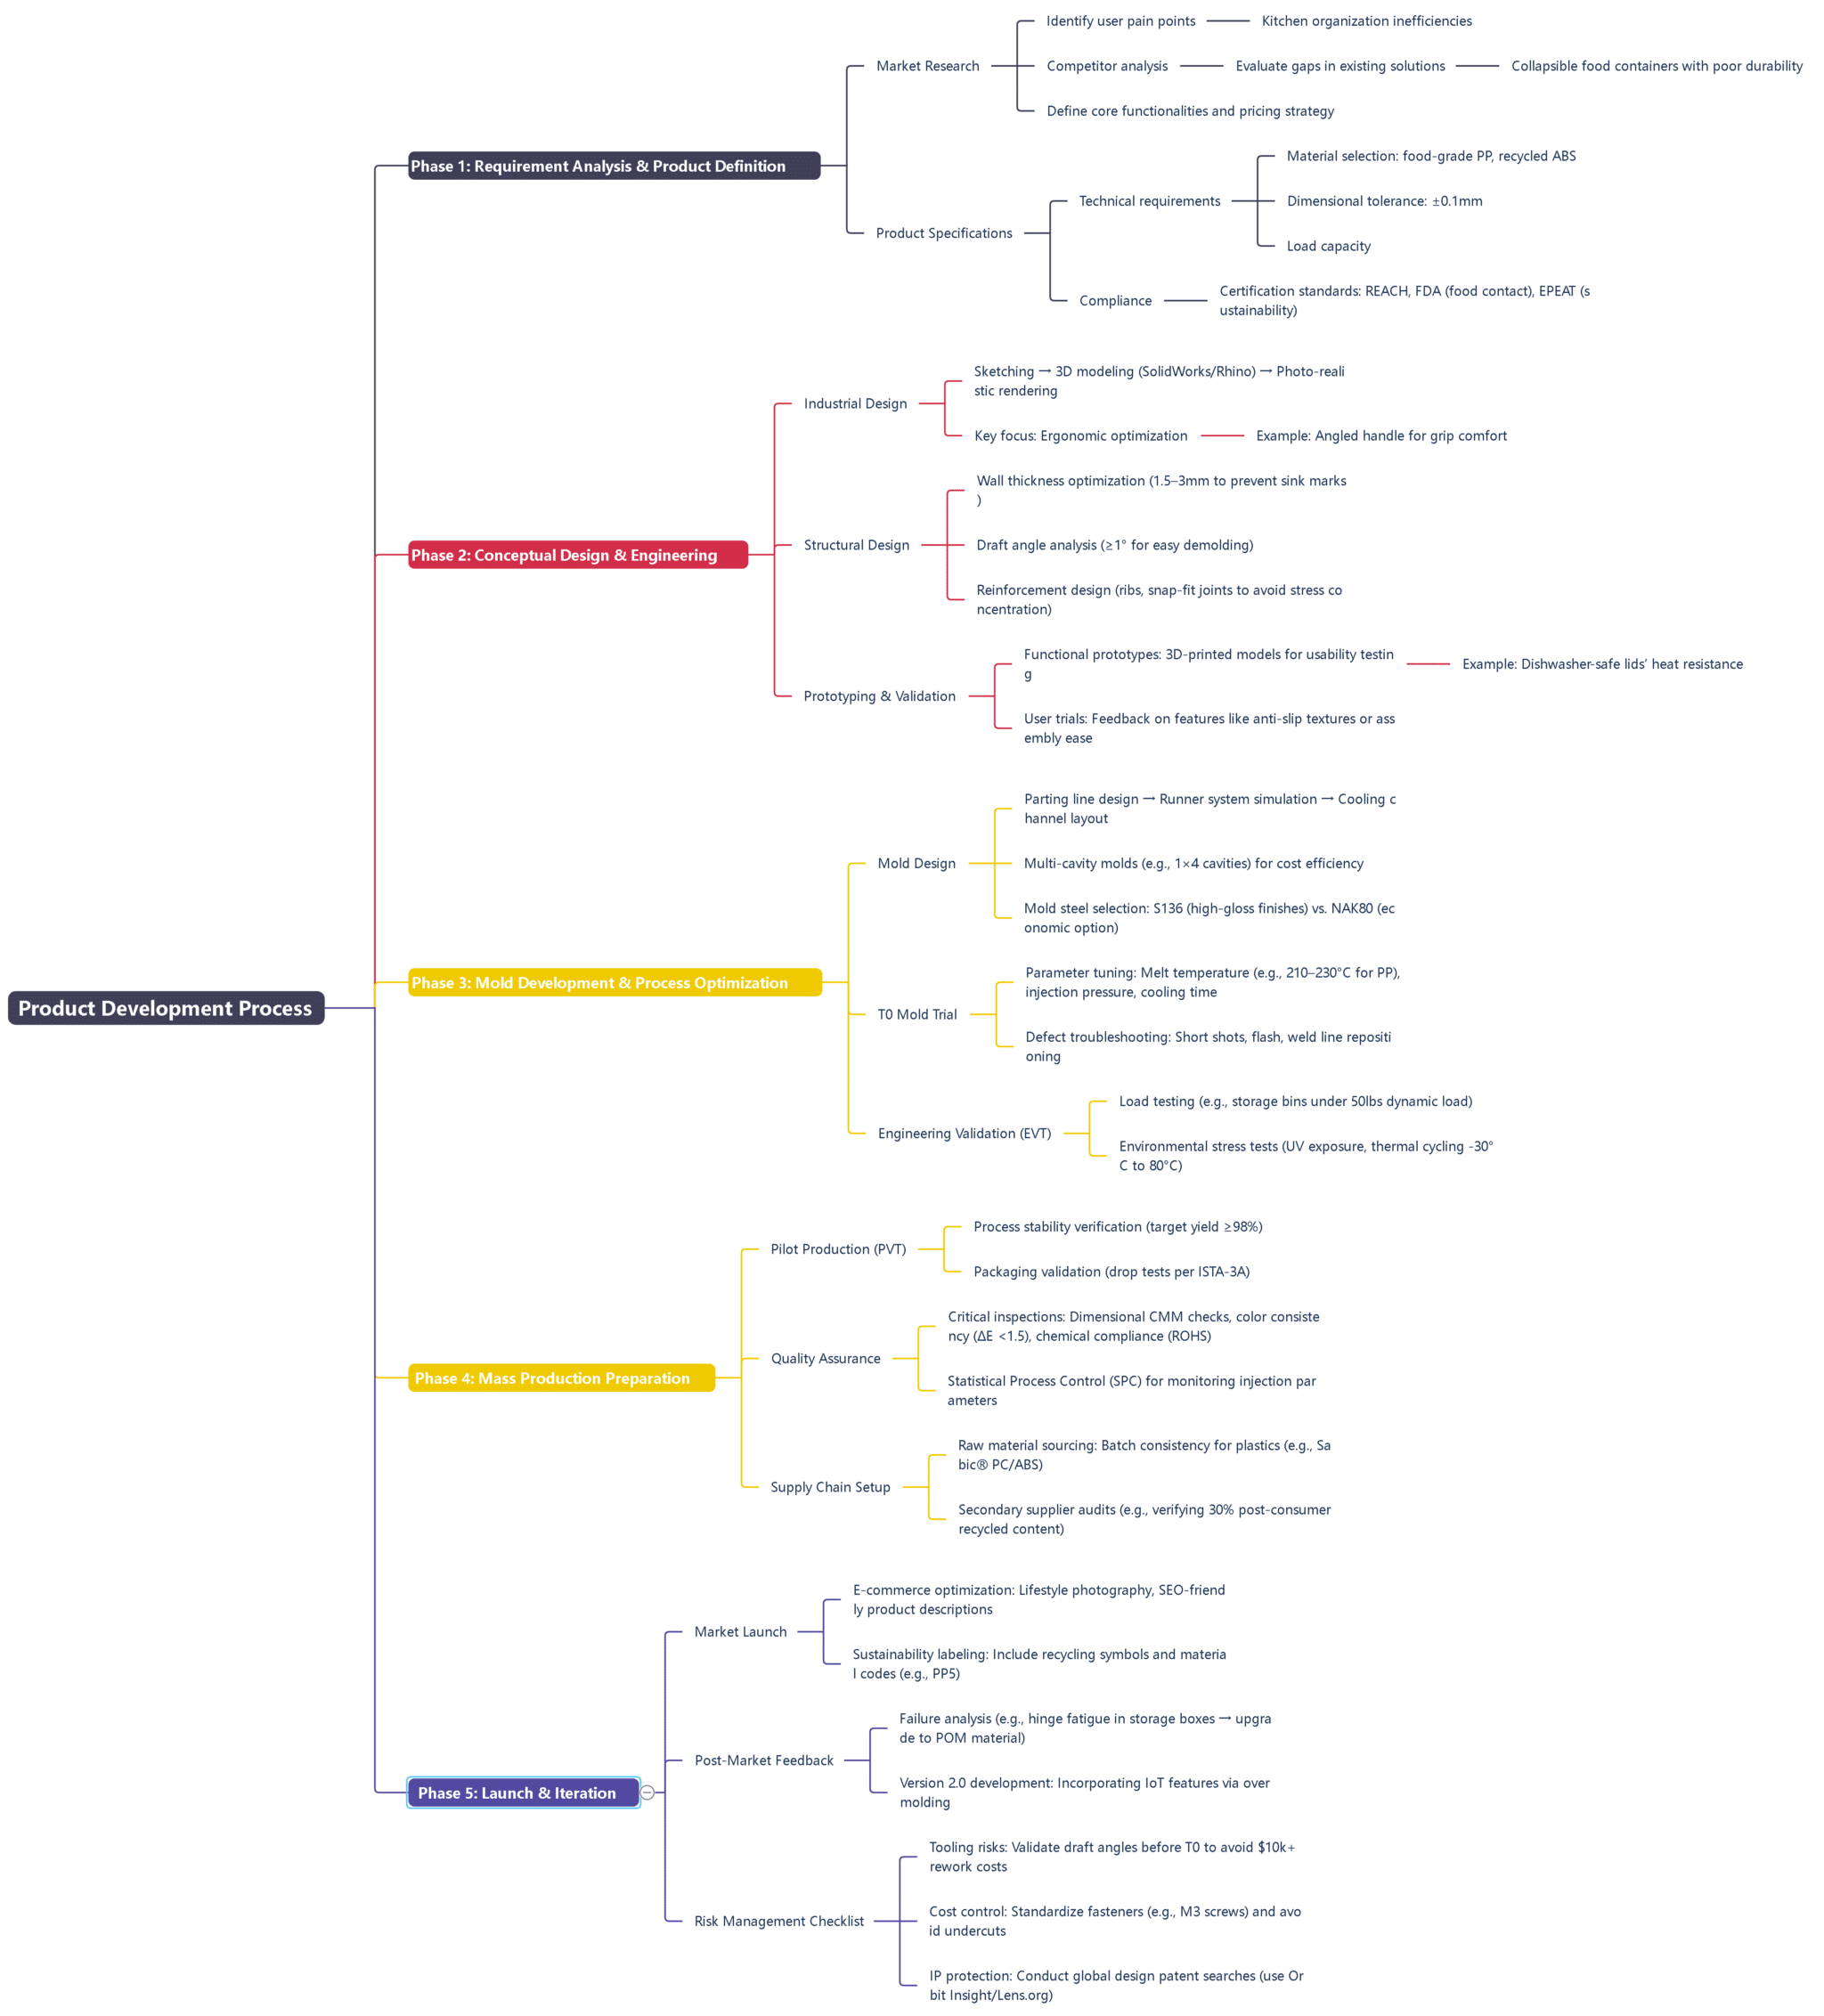
Phase 1: Requirement Analysis & Product Definition
- Market Research
- Identify user pain points (e.g., kitchen organization inefficiencies).
- Competitor analysis: Evaluate gaps in existing solutions (e.g., collapsible food containers with poor durability).
- Define core functionalities and pricing strategy.
- Product Specifications
- Technical requirements: Material selection (food-grade PP, recycled ABS,tansparent PC), dimensional tolerance (±0.1mm), load capacity.
- Compliance: Certification standards (REACH, FDA for food contact, EPEAT for sustainability).
Phase 2: Conceptual Design & Engineering
- Industrial Design
- Sketching → 3D modeling (SolidWorks/Rhino) → Photo-realistic rendering.
Key focus: Ergonomic optimization (e.g., angled handle for grip comfort) and moldability.
- Sketching → 3D modeling (SolidWorks/Rhino) → Photo-realistic rendering.
- Structural Design
- Wall thickness optimization (1.5–3mm to prevent sink marks).
- Draft angle analysis (≥1° for easy demolding).
- Reinforcement design (ribs, snap-fit joints to avoid stress concentration).
- Prototyping & Validation
- Functional prototypes: 3D-printed models for usability testing (e.g., dishwasher-safe lids’ heat resistance).
- User trials: Feedback on features like anti-slip textures or assembly ease.
Phase 3: Mold Development & Process Optimization
- Mold Design
- Parting line design → Runner system simulation → Cooling channel layout.
- Multi-cavity molds (e.g., 1×4 cavities) for cost efficiency.
- Mold steel selection: S136 (high-gloss finishes) vs. NAK80 (economic option).
- Cooling system and balance ejection.
- T0 Mold Trial
- Parameter tuning: Melt temperature (e.g., 210–230°C for PP), injection pressure, cooling time.
- Defect troubleshooting: Short shots, flash, weld line repositioning.
- Engineering Validation (EVT)
- Load testing (e.g., storage bins under 50lbs dynamic load).
- Environmental stress tests (UV exposure, thermal cycling -30°C to 80°C).
Phase 4: Mass Production Preparation
- Pilot Production (PVT)
- Process stability verification (target yield ≥98%).
- Packaging validation (drop tests per ISTA-3A).
- Quality Assurance
- Critical inspections: Dimensional CMM checks, color consistency (ΔE <1.5), chemical compliance (ROHS).
- Statistical Process Control (SPC) for monitoring injection parameters.
- Supply Chain Setup
- Raw material sourcing: Batch consistency for plastics (e.g., Sabic® PC/ABS).
- Secondary supplier audits (e.g., verifying 30% post-consumer recycled content).
Phase 5: Launch & Iteration
- Market Launch
- E-commerce optimization: Lifestyle photography, SEO-friendly product descriptions.
- Sustainability labeling: Include recycling symbols and material codes (e.g., PP5).
- Post-Market Feedback
- Failure analysis (e.g., hinge fatigue in storage boxes → upgrade to POM material).
- Version 2.0 development: Incorporating IoT features via overmolding.
Risk Management Checklist
Tooling risks: Validate draft angles before T0 to avoid $10k+ rework costs.
Cost control: Standardize fasteners (e.g., M3 screws) and avoid undercuts.
IP protection: Conduct global design patent searches (use Orbit Insight/Lens.org).
Timeline & Budget Breakdown
| Stage | Duration | Cost Allocation |
|---|---|---|
| Design Validation | 2–4 weeks | 15% |
| Mold Manufacturing | 6–8 weeks | 40% |
| Pilot Production | 3 weeks | 25% |
| Certification/Mass Prod | 4 weeks | 20% |
Pro Tip: For complex geometries, use Moldflow® simulation to predict warpage and reduce trial iterations!
Need detailed guidance on mold flow analysis or material selection? Reply with your specific challenge—we’ll break it down!